Ok, I get it. As a mom, you have a million other things to do, getting the trash off the floor into the bin is an achievement in itself. Forget salvaging it and turning it into Treasure when you have got to feed, clean and keep safe the precious treasure(s) on your lap.
But then a mom’s gotta do what she’s gotta do. You need activities to keep them busy especially when you are trying your best to limit screen time. So when we wanted to do a little recycling project with things that they themselves (toddler and preschooler) throw every day, I had to think of something easy, and creative enough to sustain their interest AND which I could manage to do with 6 tiny hands of 3 different sizes. Lesson 1 learnt – it’s never gonna be easy. Sigh!
So let’s spill the glue, rip the papers and get started.
Here’s the first one in this series.
Drinking straw art

We provide a daily supply of drinking straw to the garbage truck and I happened to notice that the current straws we were using were of fabulous neon colors. Looked too good to throw away for a blogger mom. EVery item in your kitchen should double as an art item shouldn’t it? So I started collecting them for recycling with some sort of art or craft. At first I was thinking of some innocent cut up flowers.
But when I looked for ideas… Gosh! It looks like drinking straws could be the next best invention after the wheel. You can build anything and any shape that you can build with plastic. People were making anything and everything from phone cases , flower vases and shoes to heck even an entire house. You could literally eat, drink, breathe, and live only through drinking straws. (Ok, except eat) And you would need truckloads of them!
So I had to calm myself down and think straight. What did I want from this activity?I want to be encouraging more of child-led art where they can create anything they imagine with just a little help and hinting, minus the pin-stress.
Hence this is a simple art using cut up straws that we are using to color small shapes!
What you will need:
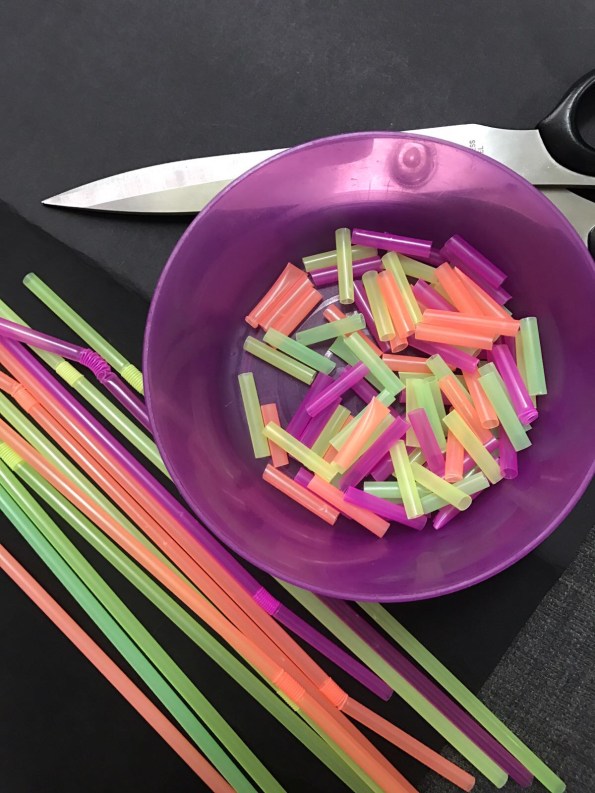
- Washed and dried used drinking straws ( I admit I took few straight from the box also )
- Scissors
- A4 size paper
- An adult with an iron
First cut up the straws into small pieces easy for little hand to pick and arrange.
fold the paper in half, press at the crease , open it back up and place it on the ironing table.
Draw you shape on one half. Now let them fill in with the straw pieces. They will blow helter skelter a bit but try to keep them still.

now carefully fold over crease withought disturbing the pieces and press down with the heated iron for a minute or two. Be careful not to burn by heating too much.
open the paper and magic! It’s now transferred and stuck to the top side.

Give yourself a round of applause, display and praise the artist and then the round of clean-up of course.


So go ahead and give it a try even if you are a p(un)interest mom.
Baked Crayon Chunks
Do your kids sport a massive collection of crayons ? Which of course is scattered all over the house for your stepping on pleasure ?
Worry not. Just collect all those annoying things, even those notorious bits and pieces and convert them into cute multicolored chunks which are pretty to look at, far fewer in number and perfect for tiny hands to hold and scribble. Now let’s just hope that the scribbling is limited to papers.
What you will need:
- All the crayons you can find at home.
- You can use any sort of mould you like. I am just going with an old muffin tray lying around which will now be used for baking only weird stuff like this.

Just break them into big pieces and arrange then in the tray.

Pop it in the oven at about 180 degrees for 5-10 minutes. Turn off and let cool.
Keep it in the freezer for a few minutes if your kids are getting impatient by now.
Flip and they should easily come off.

The kiddos were delighted with the different colours coming from the same piece!

Colourful Crayon Magnets:
Now there’s a lot you could do with these chunks apart from the scribbling. Once they got bored of that, we glued them on to small pieces of magnet and viola we got colourful fridge magnets/ white board magnets.


Need more ideas to deal with those pesky crayon bits. Check out 12 things you can do with melted crayons.
Pencil Shavings Art:
This is another popular and easy recycling project. Perfect when you are arranging and sorting their stationary things. Once the innumerable crayons have been tamed it’s time to tackle the colour pencils. With a good quality sharpener, take out neat shavings without breaking for as much as possible. Keep them all together in a tray and present it to your little Picasso along with a glue stick and let them get creative.

Candy Wrappers Art:
When it comes to candies, the struggle is real! Once you give up and give in to their demands, go an extra step and save those wrappers. Especially if they are pretty and clear ones (think Quality Street chocolates!)
Once you have enough of them which will be sooner rather than later. Just grab:
- a pair of scissors
- wide clear tape
- The wrappers

Cut up the wrapper into small shapes. Join together a few pieces of tape and allow the child to stick it on as they like.

Piece all together with more tape if required, frame it and applaud the little artist. 
We just have two colours here as we couldn’t save the rest. I bet it would look lovely with all the beautiful colours they come in.
Do give these a try and tell us your favourite ideas for recycling crafts. For more east kid’s activities inspiration, check out the posts below.
Pingback: 12 Things You Can Do With Melted Crayons
Awww these look great! What a creative way to inspire budding little artists !